When it comes to holiday decorating, one of the most frequently asked questions is: “What’s the optimal number of ornaments for my Christmas tree?” Whether you’re aiming for a lush, fully-decked tree or a minimalist modern look, getting the right ornament-to-tree ratio is key to achieving a balanced, beautiful holiday display.
In this guide, we’ll break down how to determine the optimal number of ornaments for your tree based on size, style, and your overall design goals.
Why the Right Number of Ornaments Matters
Overcrowding your tree can make it feel cluttered, while too few ornaments can leave it looking bare and unfinished. The optimal number of ornaments creates visual harmony, enhances your theme, and ensures that your tree shines from every angle.
General Rule of Thumb
A good starting point is:
20 ornaments per foot of tree height
This means:
-
A 6-foot tree = approximately 120 ornaments
-
A 7.5-foot tree = around 150 ornaments
-
A 9-foot tree = about 180 ornaments
This includes a mix of ball ornaments, specialty pieces, and filler decorations.
Tree Size vs. Ornament Quantity
| Tree Height | Ornament Count (Standard Look) | Ornament Count (Full Look) |
|---|---|---|
| 4 feet | 60–80 | 90–100 |
| 6 feet | 100–120 | 140–160 |
| 7.5 feet | 140–150 | 180–210 |
| 9 feet | 180–200 | 240–270 |
| 12+ feet | 300+ | 400+ |
Note: If you’re using large statement ornaments or incorporating ribbons, florals, or picks, you may need fewer hanging ornaments.
Factors That Affect the Optimal Number of Ornaments
1. Tree Type
Slim or pencil trees need fewer ornaments due to their narrow shape.
Full trees require more coverage, especially around the sides and back.
2. Ornament Size
Larger ornaments cover more area, reducing the total number needed.
A mix of large, medium, and small ornaments helps create depth and dimension.
3. Tree Visibility
Is your tree placed against a wall or viewed 360°? If fully visible, decorate all sides evenly.
Trees in corners or alcoves can have lighter coverage in hidden areas.
4. Theme or Style
Minimalist themes (Scandinavian, modern) might only use 50–75% of the recommended count.
Maximalist or traditional trees often go beyond the “standard” amount to achieve a grand look.
Ornamentation Tips for a Stunning Tree
Designing a visually striking Christmas tree is as much about technique as it is about creativity. Beyond simply hanging ornaments, how and where you place them determines whether your tree feels thoughtfully designed or randomly decorated. These tried-and-true tips will help transform your tree into a balanced and beautiful centerpiece for the holiday season.
Layer Your Decor
Think of decorating your tree as a layering process, not a one-step task. The order in which you apply your elements affects both the overall aesthetic and practicality of your design.
-
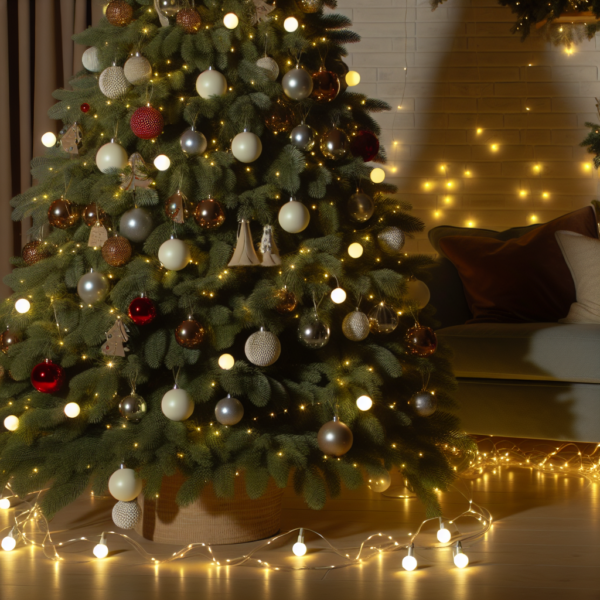
Start with Lights: Begin by wrapping your tree with lights if they’re not pre-lit. Start at the base and work your way up, weaving lights along the inner and outer branches to create depth. This first layer sets the visual foundation and ensures even illumination from the inside out.
-
Add Garlands or Ribbon: After lighting, drape garlands, mesh, or ribbon. Whether you go for a classic bead garland or contemporary wide ribbon, install it loosely so it flows naturally. Spiral the ribbon from top to bottom or apply it in vertical strips for a modern look. Avoid pulling it too tight—it should appear draped and effortless.
-
Hang Ornaments: Once the lighting and garland are in place, begin ornamentation. Start with the largest ornaments first, spacing them evenly to anchor your design. Follow with medium-sized and then smaller pieces, filling in gaps and adding variety in placement.
-
Finish with the Topper: The tree topper should complement the theme and balance the tree visually. Whether you prefer a star, angel, or bow, ensure it’s securely attached and aligns with the scale of your tree.
By following this layering method, each element is showcased without overwhelming the others, resulting in a polished and intentional display.
Use Ornament Hooks of Varying Lengths
One of the easiest ways to give your tree a professional, multi-dimensional look is by using ornament hooks of varying lengths—or adjustable string loops and ribbon ties.
-
Short hooks or loops bring ornaments close to the branch tips, perfect for showcasing delicate or high-impact decorations.
-
Longer hooks allow ornaments to hang deeper within the tree, helping to create layers of visual interest.
This variation mimics the natural density of a real tree and avoids a flat, one-dimensional look. Tuck glittering ornaments deep into the branches so they catch and reflect light from within, while hanging statement pieces closer to the outer tips.
Also, don’t overlook specialty hangers—decorative hooks or clear fishing line can be used strategically to ensure each ornament hangs exactly where you want it without distracting from the design.
Hang in Zones
Rather than randomly placing ornaments, organize your decorating process by dividing the tree into zones:
-
Top Zone: Use smaller, lightweight ornaments near the top where branches are shorter and more delicate. This section often benefits from brighter or shimmering pieces, as it’s closest to the light source and most visible from across the room.
-
Middle Zone: This is the focal point of your tree. Medium-to-large ornaments belong here, especially those with sentimental value or striking designs. Ensure the color scheme is balanced on all sides, as this area is often at eye level.
-
Bottom Zone: Heavier and larger ornaments should go toward the base. These help anchor the visual weight of the tree. Incorporate unique textures like wood, fabric, or natural elements to give this section warmth and personality.
Additionally, use this zone strategy to balance color distribution, ensuring one area doesn’t become overloaded with a specific hue or ornament type. This methodical approach makes your tree look cohesive and visually harmonious from all angles.
Step Back Often
As you decorate, pause regularly to step back and assess your progress. Viewing your tree from different distances and angles helps you identify:
-
Empty or sparse spots that may need more ornaments or filler.
-
Clusters that feel too dense, which can be adjusted by spacing items out or relocating pieces.
-
Visual imbalances in color or theme concentration.
Use a mirror to see the backside if your tree is in a corner, or ask someone else to give it a fresh pair of eyes. It’s also helpful to take photos on your phone—decorative inconsistencies are often more noticeable in pictures.
By checking your work as you go, you’ll avoid needing to redo large sections later and can fine-tune the overall symmetry and balance of your design.
Group Ornaments in Threes
Designers often use the rule of threes to create balance and visual interest. Grouping ornaments in clusters of three—or other odd numbers—helps draw the eye in a natural, aesthetically pleasing way.
Here’s how to apply this concept to your tree:
-
Same-style clusters: Hang three similar ornaments (same color or shape) in a loose triangle on the tree to make them pop without feeling repetitive.
-
Vary size and texture: Combine a large matte ornament, a medium glittered ball, and a small glossy one in the same color family for a high-end designer look.
-
Themed groups: For thematic or storybook trees, cluster ornaments that tell a story—like a snowflake, sleigh, and snowman in close proximity.
Space these groupings around the tree, adjusting for visual flow and density. Grouping ornaments allows even simple or budget-friendly pieces to look intentional and artistic, especially when paired with cohesive colors or finishes.
The Final Touch: Personalization
While these guidelines provide a strong foundation for finding the optimal number of ornaments, the most important element is your personal style. Sentimental keepsakes, handcrafted pieces, and family traditions bring warmth and story to your holiday decor.
Don’t be afraid to break the rules a little—just use this guide to ensure your tree is balanced, beautiful, and brings joy all season long.
Explore More Holiday Tree Tips
Looking to take your tree decorating skills to the next level? Check out our guide on The Art of Christmas Tree Lighting: Best Practices and Creative Display Ideas for more inspiration.